In this guide, I’ll quickly explain how to set up a network printer using WSD plug&play so you can start using your network printers on Windows 10 right away. Let’s start printing!
 Windows 10 is still very similar to Windows 8 and even 7 and adding a network printer is still possible to do in less than 5 minutes. If you know the IP of your printer or the name of the ‘share’ you will walk through this guide even quicker, so you may want to look that up first.
Using The Device Manager To Add It
1. Step Open the device manager either hit Windows key + R and type devmgmt.msc or open it via the traditional Windows user interface or enter ‘devices and printers’ into the Windows 10 search bar
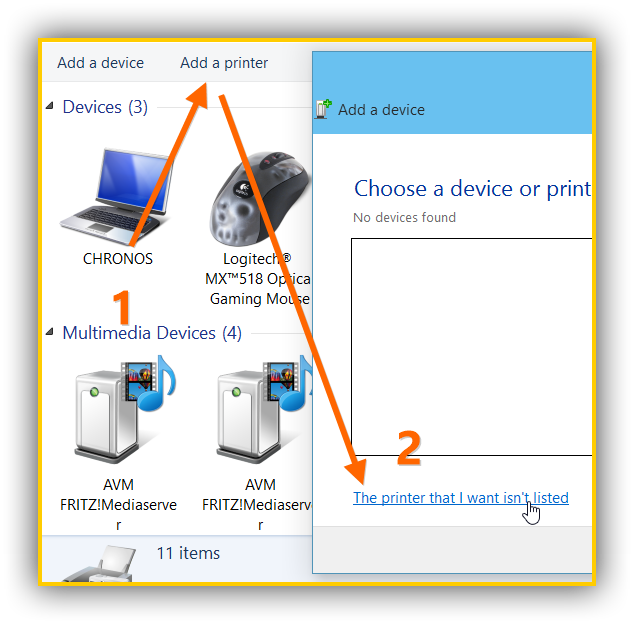
2. Step On the device manager page, select Add printer at the top
IMPORTANT: Wait until the scan has been completed. If you’re lucky it will already list your network printer.
3. Step Nothing showing up? Select the blue link at the bottom ‘the printer that I want isn’t listed’:
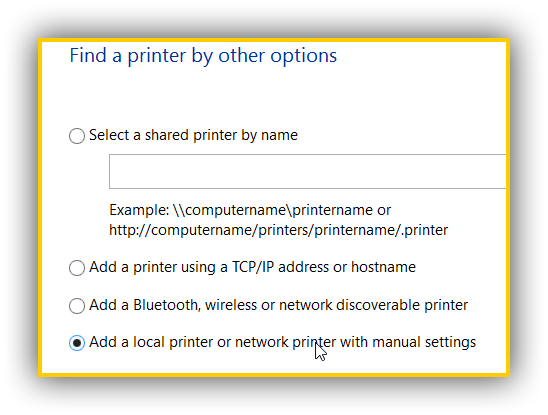
4. Step Ok, do you EITHER know the IP or the printer share name? For example 192.168.2.35 or \\myPCname\HP200 – if you do, select the option Add a printer using a TCP/IP address or hostname or, respectively, the option Select a shared printer by name.
You can look up the printer IP via your router configuration panel that is accessible via 192.168.0.1 (Netgear), 192.168.1.1 (Linksys), 192.168.2.1 (AVM, Fritzbox) or a similar IP depending on your router manufacturer
Don’t know the IP or the share name? No worries, select the option Add a local printer or network printer with manual settings will work just fine
5. Step Windows 10 will ask you what port to choose. Say ‘use an existing printer port’ and from the dropdown select WSD. If you see multiple, pick the first
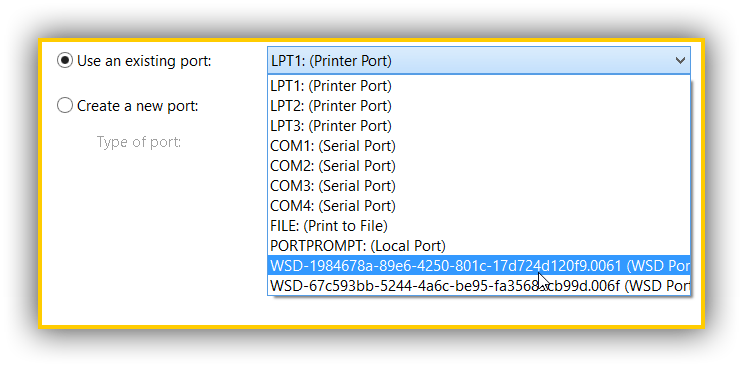
LTP, COM1, other ports can only can be used if you connect a printer via a device cable, but for home & small office network printers we use WSD, which is a special plug-and-play monitoring service that will auto-detect your printer.
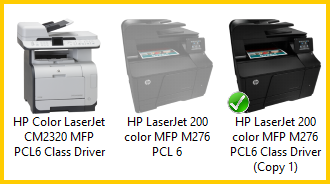
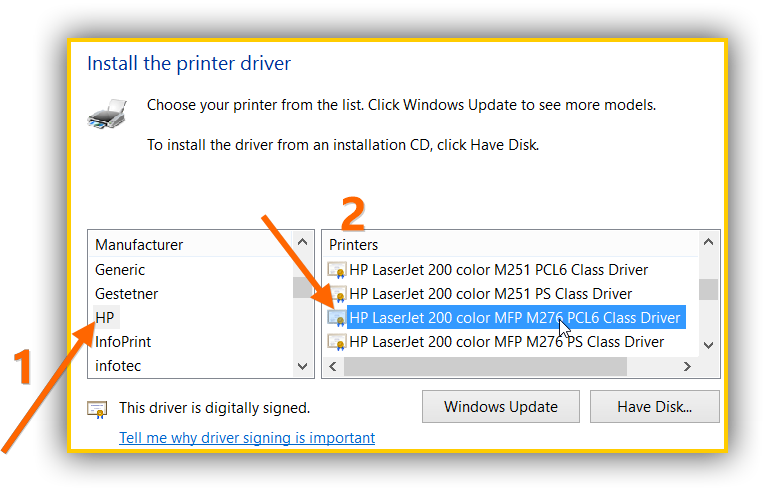
6. Step Now we can finally install the printer driver. In order to do that you need to go to your printer (in-person) and on the bottom of the device you will find the exact model, for example HP LaserJet 200 color (MFP M276 PCL6 Class Driver).
Tip: If you can’t find the model, go through the list and see if you find a similar name. If not, google your printer and find out what model you are using. Once you know the exact model you can install the correct drive and continue:
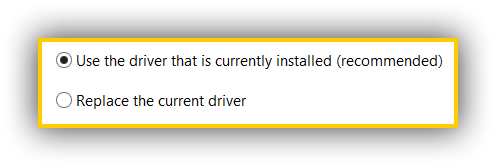
7. Step Windows will most likely tell you that it found an existing driver, confirm that.
8. Step You will be given the option to share your printer, either don’t or provide a ‘share name’ that will be visible to others connected to your network.
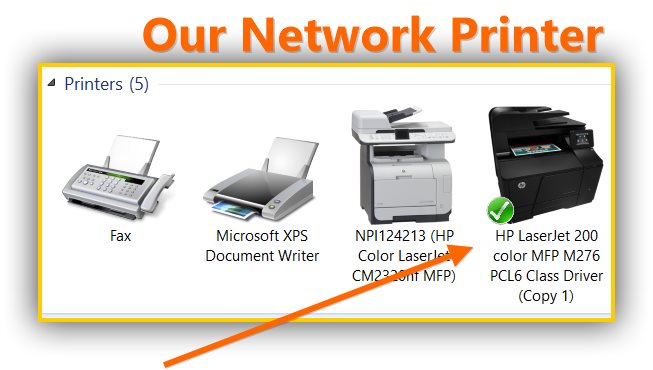
9. Step You can now print a test page (which you should) and set it as the default Windows 10 printer that will print all documents and show up as default on the print dialog
The printer should show up with its icon:
If you see the default printer icon AND you are unable to print something may be wrong and you should repeat the steps and be more careful this time. Also try the other options I listed such as finding a printer by IP or share.
What is a WSD Printer Port?
WSD is a plug and play port scanning service and not a physical port. It can help you to auto-detect devices and printers – no USB cable is required whatsoever for devices connected via WSD. Windows 8 starts the WSDmon (monitor) service by default and so does Windows 10.
Please note that in corporate environments you may want to avoid WSD. WSD will stop working after a certain number of devices have been added. Using a fixed IP and share-name for each device is recommended. WSD may come in handy if you own only a bunch of network devices, but if you own over 100 network devices this is not the way to do it.
Why Network Printers
Network printers are extremely handy if your printer is not plugged into your computer. For example if you have a home office or regular office, chances are you will have your own room for a printer. Then it’s really handy to know how to install a network printer so you can simply hook up the printer to your switch and start printing.
Pro Tip: Using A NAS For Network Printing
Windows users can also connect a printer to a NAS (if it supports network printers) and then access a network printer via the NAS. We outlined how this works in this NAS guide
So if you have a NAS that is accessible via \\HMNHD-TI2N0L\ then you only have to assign a share name to your printer e.g. HP200 and then you can use the option Select a shared printer by name.
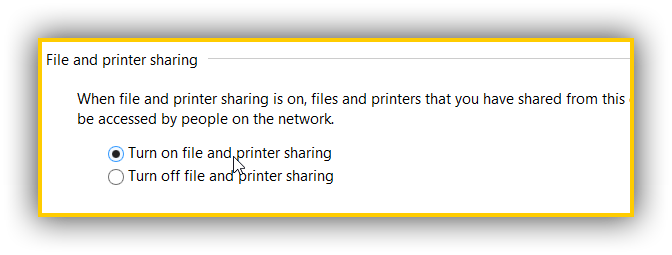
Turning On File And Printer Sharing
If you don’t mind typing, simply hit Windows key + R and enter control.exe /name Microsoft.NetworkandSharingCenter , then in the sidebar you’ll find the option Advanced Sharing settings, proceed with step 5 to turn printer sharing on.
If you don’t have a keyboard plugged in or prefer to use a GUI to see where you’re going:
1. Step Simply open the control panel by entering control panel into the Windows 10 search bar and it will pop up at the top
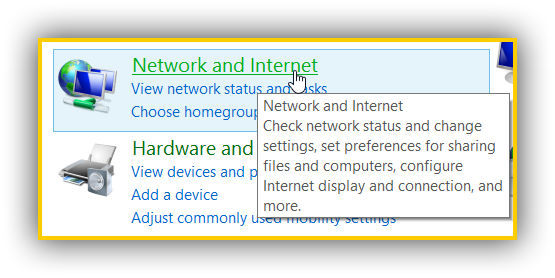
2. Step Click on Network and Internet
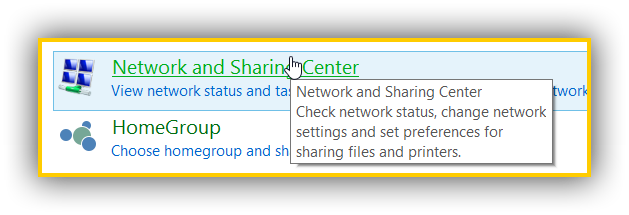
3. Step Open the Network Sharing Center
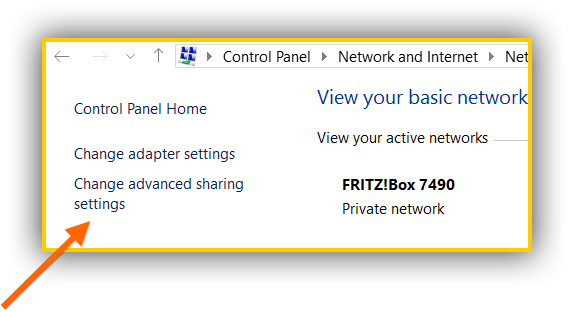
4. Step Select the option Change Advanced Sharing Settings
5. Step Now you can turn on File and Printer Sharing: